
By Don Mercer
Now that the days are getting longer and the warm days of Spring appear to be just around the corner, the thoughts of many people are solidly focused on the joys of the upcoming gardening season. Along with considerations of what to plant, you may also want to begin planning what you are going to do with the fruits and vegetables you harvest.
This is the ideal time to consider drying various fruits and vegetables as an added alternative to the more traditional approaches of canning and freezing. Home food dehydrators have become increasingly popular in the past few years and the results can be really quite amazing. There are also many sources of information on the topic, both on-line and in books to help you get started.
The basic principle of food dehydration (or “drying”) is quite simple. Food spoilage depends largely on the presence of moisture to support microbial growth or aid in other degradative processes. If the water is removed from a food material, the risk of spoilage is greatly reduced. Moisture can be removed in a variety of ways, but forced-air drying is one of the most common and efficient methods, which is the case with most of today’s commercially available food dehydrators. They heat the incoming air to a desired temperature and blow it across the surface of the food by means of an internal fan.
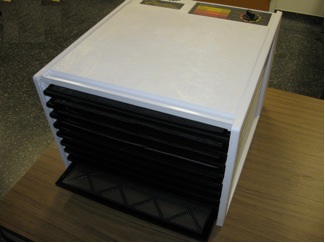
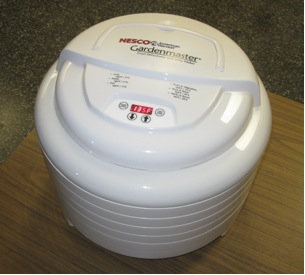
Some dehydrators, like those in the Excalibur® line, have a set of square plastic mesh racks on which the prepared fresh material is placed. These racks slide into the drying chamber where a continuous stream of warm air removes the water. Other dehydrators, like those by Nesco / American Harvest ®, use stackable trays to hold the produce being dried. Once again, a fan circulates heated air throughout the unit. These are the two most popular brands of dryers available and both do an excellent job. Before deciding which type to purchase, you should visit each company’s website to determine which best suits your needs. Don’t forget about your future needs as well as your initial needs.
If you do plan to purchase a home food dehydrator, now is an excellent time to do so. You can familiarize yourself with the dehydration process and gain experience before you begin to harvest your garden crops. Reading the instructions that come with your dehydrator is the most important step to getting started. Then a few practice runs are in order. Personally, I would recommend starting with something fairly straight-forward like dried apple rings.
Apples are available at a reasonable price in most grocery stores throughout the year. Select high quality apples that are reasonably sweet. “Macs” are ideal for this purpose. As the water is removed, the sweetness of the apples intensifies, which makes them an appealing snack. Wash the apples, peel them (if desired), and core them. Then, slice the apples crosswise into rings about a quarter of an inch (5 mm) thick. You may want to dip the slices in lemon juice or a commercially available preparation to prevent them from browning during the drying process (this is entirely optional). Allow the excess lemon juice to drain from the surface of the rings and place them on the plastic mesh dryer racks. Be careful not to have them overlapping as this will slow the drying process. With the dryer set at 130̊F (55̊C), it should take about 6 to 8 hours for the apple rings to dry. It’s a good idea to check the progress of your drying periodically and flip the apple rings about half-way through the process. Once suitably dried, the apple rings will feel dry and leathery, and be spongy and firm. Remove the apple rings from the dehydrator and allow them to cool before placing them in an air-tight container for storage.
One common mistake is not fully drying the apples. If too much moisture is left in the apples, they will spoil. There are many reference sources available on the subject of home food drying.
It is a good idea to keep accurate records of your drying activities. Label all containers so that you can refer back to the conditions for a particular batch of dried foods. Once you feel comfortable with drying apples, you can move on to other things and enjoy this convenient way to process some of your own fruits and vegetables.
(Copyright Donald G. Mercer 2013)
Gardening season is now in full swing and in a short time, many of you will be faced with the burning question, “What on earth am I ever going to do with all these _____________ ?” You can fill in the blank with the appropriate item, but most likely tomatoes will be near the top of this list. The “Do It Yourself” (DIY) phenomenon which has touched just about every part of our lives offers an interesting, enjoyable, and rewarding solution to this problem.
Food dehydration or more simply “drying” has been a recognized method of preserving food and preventing spoilage for thousands of years. Even our ancient ancestors probably relied on naturally dried fruits, especially berries, as a source of food. Food drying has made tremendous technological advances since these early days and we understand a great deal more about its complexities than we ever did before. In spite of the science that goes into food drying, much of it is still an art. Now, thanks to well-designed and efficient home food dehydrators, almost everyone can dry the fruits and vegetables from their backyard garden with surprisingly good results. All you need to get started is a ready-to-use food dehydrator that is available from many hardware stores (or on-line) at a reasonable cost. There are some folks who like to make their own dryers, but this isn’t nearly as convenient and the results can often be less than desirable. What I personally like about the commercially available dryers is that all of the design features are already built in. They are also easy to clean and disassemble when needed. Some dryers even offer the option of adding extra trays if you wish to expand their drying capacity.
Prior to shopping for a home food dehydrator, you need to consider a few basic facts. Be sure to buy a dryer that has sufficient power to provide enough heat for the anticipated tasks. If you plan to do lots of drying, you should consider buying a dryer with a more powerful heating unit. Food dryers are just like hair dryers - the higher the wattage, the more heat they produce. You should also get a dryer with a good air circulation fan in it. Air movement and temperature are two of the key factors in drying any material, so a high wattage dehydrator with a good fan is the way to go. I have three home dryers that I use: two models by NESCO/American Harvest and one by Excalibur. All three work quite well, while offering somewhat different features. The ultimate choice of dryers is a personal one.
After purchasing a dryer, the first thing to do is sit down and read the instruction booklet thoroughly. As a typical male, I know that there is an overwhelming temptation to forego this step and head right to the actual use of the device. However, I learned a long time ago that instructions are generally provided for a good reason.
You may want to do a few practice runs to get the feel of things before you actually start drying produce from your own garden,. Apples are an excellent choice for this purpose. You can buy a few apples; wash, peel, and core them; and slice them into about quarter inch (0.5 cm) thick rings using a paring knife or kitchen slicer. Some folks prefer not to peel them. This makes very little difference to the drying process, but you may find the peels become a bit hard or tough which can detract from the enjoyment of eating the dried apple rings. Some produce, like apples, may turn slightly brown during drying - this is nothing to worry about. Browning can be reduced or prevented by dipping the apple rings in lemon juice or a solution of ascorbic acid (Vitamin C). You should arrange the apple rings on the dryer trays so they are not touching and dry them at about 55°C (i.e., 130°F). It’s a good idea to rotate the dryer trays or racks periodically, in case there is some uneven drying. Flipping the rings over will also aid in their drying. After about five or six hours, the drying should be complete. The doneness can be tested by bending the rings. They should feel dry and leathery while being spongy and flexible. If you are in doubt as to whether they are done, simply give them some additional time in the dryer and recheck them. After they have cooled, you can store the dried apple rings in an airtight container for future use as a snack or as an ingredient in a recipe. Once you have mastered the basics of food drying, you can become more adventurous and try a wide variety of food items.
Much of home drying is a trial-and-error process. High-moisture items such as tomatoes will take considerably longer to dry than apple rings (up to 24 hours compared to 5 or 6 hours for apple rings). Be sure to keep a notebook record of what you have done and label each batch of product you dry so that you can refer back to how you dried things at a later date, if necessary. It’s a good idea to purchase one or two good books on the subject to give you some advice on what to do (and more importantly, what not to do). You will also find recipes on how to use your dehydrated foods so that you can enjoy the bounty of your garden throughout the long winter months.
Here are some pointers:
DO’s:
∙ Have fun and enjoy the food drying experience.
(Copyright Donald G. Mercer 2013)
Anyone who has ever stepped into a closed car on a hot summer day will definitely know the power of the sun’s rays to heat a confined space. The same principles that cause the interior of a car to heat up can provide a “green” opportunity for drying various fruits and vegetables without additional energy inputs.
I have always looked upon solar drying as a highly promising technology for food preservation and feel that it is capable of addressing many of the issues faced in developing countries. It might be thought of as a solution looking for a problem. However, after some first-hand on-site experience, my impression has changed a bit. I still think it has many merits, but there are a few concerns that need to be kept in mind. Let’s take a closer look at solar drying and put these in perspective.
At the outset, we should probably differentiate between “solar” and “sun” drying. Although both use the sun as a source of energy, the term “sun drying” often describes the process of spreading things out in the open sun to dry; whereas “solar drying” usually involves a cabinet or drying chamber of some description. Many of you will be familiar with sun-dried tomatoes and raisins which are examples of successful (and safe) commercial applications of sun drying.
On-line “web” sources are full of information on how to build a solar dryer. Designs range from incredibly simple to highly elaborate devices. Whatever the design, each has the same basic elements. First, you need an enclosed cabinet, normally with a glass panel on the front. The sun’s rays will travel through the glass and be trapped inside, thereby raising the temperature - just like a car on a hot summer day. By lining the cabinet with metal, a drying oven effect can be obtained. Open mesh or wire racks can be positioned inside the cabinet to support the material being dried. A flow of air is necessary to carry away moisture from the surface of the material and remove it from the cabinet so that more water can be evaporated. An even more favourable drying environment can be created by heating the air before it enters the drying cabinet. A heat collector made from sheet metal and painted black works extremely well for this purpose.
A number of years ago, I began working with solar drying as a means of preserving garden crops at the family farm level in developing countries. In areas of Equatorial Guinea, which lacked electricity and running water, there was no easy way for people to preserve food from their gardens for use in the off-season. They experienced much the same situation as we do when all our tomatoes etc. ripen at the same time and we have an over-abundance. However, once their growing season was over, these impoverished people had to rely on imported produce to meet their needs. Since Equatorial Guinea lies just a few degrees north of the equator, one would expect that it would be ideally suited for solar drying. Unfortunately, the rainy season begins just when the crops are being harvested, and overcast skies with afternoon rain showers are a serious obstacle to solar drying.
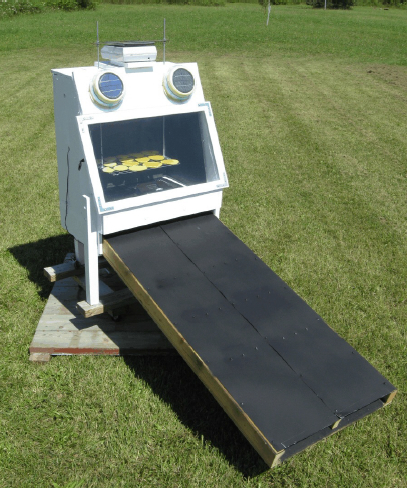
The solar dryer which I built looks like a cousin of R2D2 of “Star Wars” fame as it stands in our yard. Over the years, I’ve introduced a few bells and whistles to boost its performance a little. Many solar dryers rely on the natural flow of warm air up through the drying cabinet to remove the moisture. I use a couple of solar-powered fans to draw the moisture-rich air out of the dryer and subsequently replace it with warm dry air that has travelled through the heat collector. These are the round circles that look like eyes in the photograph. An additional small solar-powered fan inside the cabinet ensures adequate air circulation for drying. There is also an electronic balance assembly to follow the drying progress for research purposes, but most solar dryers ignore this feature. It is also possible to have a number of racks in the dryer instead of the single rack shown here.
Tomatoes seem to be what most people want to dry - yet they are the most challenging. Tomatoes are absolutely remarkable in their ability to hold water. Many varieties (even Roma) contain up to 94% water! If you start with 22 pounds (10 kg) of tomatoes, 20.5 pounds (9.3 kg) of water would have to be removed to obtain a suitably dried product. For your efforts, you would end up with about 1.5 pounds (700 grams) of dried tomato wedges. Drying could take several days under ideal conditions of sun and humidity - and above all, no rain. Getting these ideal conditions is the big challenge in many locations.
Unlike the summer we’ve had so far, our part of Ontario usually has an abundance of sunlight which can be harnessed for “solar drying”. This may be tempting to those who want to try their hand at solar drying in their own backyard.
This brings me to my words of caution for anyone about to start their own solar drying. Be extremely careful to dry the material fully. If the dried product is not leathery in texture, it probably still contains sufficient moisture to promote the growth of spoilage microorganisms.
It may take a few days to dry something like tomatoes. Do not leave things in the dryer during non-drying hours. Remove them and place them in your refrigerator overnight to prevent spoilage. The long drying time is a major concern to me.
Be sure to protect the material being dried from insects. Flies love to linger on the surfaces of food as it is drying. Mesh screening across the air inlets and outlets of the dryer could help here.
Read as much as you can on solar drying before attempting it at home.
Like you, I am very concerned about food safety and want to avoid any unnecessary risks. Based on the reliability of electric home dehydrators which were discussed last month, I’m tending to favour them for use in our part of the world. Meanwhile, each summer I continue looking for ways to enhance the performance of small-scale solar drying units. Whatever your personal preference, enjoy your drying experiences and be safe.
For further information on this topic, you may wish to check out: “Solar Drying in Developing Countries: Possibilities and Pitfalls” by Donald G. Mercer. Chapter 4 in “Using Food Science and Technology to Improve Nutrition and Promote National Development: Selected Case Studies”. G.L. Robertson and J.R. Lupien, editors. Published on-line by the International Union of Food Science and Technology (2008). This can be accessed at: Chapter4_Mercer.pdf
(Copyright Donald G. Mercer 2013)
IUFoST Scientific Information Bulletin (SIB)
FOOD FRAUD PREVENTION

Congratulations to Prof. Dr. Puwiyatno Hariyadi who has been elected to the position of Vice-Chair of the CODEX Alimentarius Commission.
Dr. Hariyadi is a Fellow of the International Academy of Food Science and Technology (IAFoST) and Senior scientist, SEAFAST Center; Professor, Dept. Food Science and Technology, Bogor Agricultural University, Indonesia.
(UPDATED) EBOLA VIRUS DISEASE (EVD): IMPORTANT ASPECTS FOR THE FOOD SCIENCE AND TECHNOLOGY COMMUNITY
EBOLA VIRUS DISEASE (EVD): IMPORTANT ASPECTS FOR THE FOOD SCIENCE AND TECHNOLOGY COMMUNITY
MEETING THE NEEDS OF THE AGEING POPULATION - IMPLICATIONS FOR FOOD SCIENCE AND TECHNOLOGY
SHIGA TOXIN PRODUCING ECOLI: GERMANY 2011 ESCHERICHIA COLI O1O4:H4 OUTBREAK LINKED TO SPROUTED SEEDS
ROLE OF FOOD SCIENCE AND TECHNOLOGY IN COMBATING FOOD INSECURITY